31 December, 2014

2014 - last post this year!


Inspired by working on big stuff in December doing the Imperial Knight I have started on some terrain pieces to get some bigger pieces done in early 2015. Also, I am planning to play more games. Plus the usual hobby stuff. See you in 2015. Happy Painting!

24 December, 2014

Imperial Knight, day 24 - finished!

What a journey! I have never painted a model of this size before, and where it has been hard at times I do think that the rewards of seeing this BIG DUDE finished is really awsome.


What is your favourite part, I ask myself? The verdigris effect on the copper rims. The idea of having weathered copper plating on the Knight corresponds so nicely with Church roofs and a general grim-dark gothic style that it had to be tried. It is not perfect, but it is a start into something really challenging and fun. I definately want to try other techniques like this in the future.

Overall, I am really happy with the vivid colour scheme. The colour literally attacks your eyes, but he still suggest a dark and gritty universe. That is quite nice I think. He will really stand out nicely on the battlefield for sure.

Regarding the photos I will do some crisper shots and more angles when there is proper light and time.

Well, that's it for now... Season Greetings and Happy Painting!

23 December, 2014

Imperial Knight, day 23 - finishing touches

Lots of little things. But images first:


 Final weathering:
  • Verdigris-style weathering of the copper areas. A bold move, I know, but this is how it is gonna be! I used GW's Technical paint for this, but added white to make it lighter in places.
  • Additional bigger scratches on the armourplates using a broken black (add a little bleached bone to the black), rust streaks, plus washes of various kind on both metal areas and plates.
  • Airbrush of dark grey around the chimneys (done before the top part was glued on).
  • Tamiya clear smoke for all the working phistons - gives an oily look as well as providing good shading. 
  • A handful more purity seals to jazz up areas that could do with a little additional touch of 40K iconography.
  • Touching up here and there...

I could easily spend more hours on this model, but I think I will stop for now. Final photos tomorrow!

22 December, 2014

Imperial Knight, day 22 - basing up

Most work done on the base. Maybe I'll add a little contrat later, but I want to keep the base fairly plain. Focus should be on the big robot.


Base colours thinned with water (and a drop of dish soap to break the surface tension making the paint flow more easy) and washed over the base. Then some washes mixed with some MIG pigments. Some drybrushing. Static grass. Matt varnish. More drybrushing, including drybrushing the grass. Then pure MIG pigments.

Next up - final weathering/tweaking/washing of the robot.
And then photography for the last update on the 24th...

21 December, 2014

Imperial Knight, day 21 - detail-work

Getting closer to a finished model, but today it is about the details.
Here are the shield, banner and helmet. Still a little weathering detail-work left but good enough for a close-up I think.

 
I am also working on getting some colours onto the base. The terrain will be barren with turfs of withered grass. More on that in tommorow's update.


The big question is how much weathering and tweaking the model needs when all parts are assembled...

20 December, 2014

Imperial Knight, day 20 - colours are final

Last night I was in doubt about the yellow on the checked areas. However, today - as the first thing to do - I thought I would work on getting most of the copper to a nice finish. I also working on getting the last few small areas that needed som work done - knee-armour plating and the heraldic shield. Then I assembled the model loosely and I think he works now. With the current colours! Yay! So no need to change the planned colours. Now is is about getting that final distance to the goal!


19 December, 2014

Imperial Knight, day 19 - checks...

Hi all, no picture update tonight.
However in the comments on last night's update lé kouzes questions the yellow checks. And rightly so. Today my mind has been wondering about the checks. The yellow is so powerful. Probably too powerful.
So I am debating to go red and black or as suggested to paint over the yellow with a creamy white, or maybe just a greyish white...

So there it is; thinking cap on.
Which might mean to sit down and try it out later...

18 December, 2014

Imperial Knight, day 18 - copper it is...

I have decided for copper for the rims. Finally.


White will only be used for the head, the weapons, the markings and the imperial eagle above the helmet. The white rims did work to some extent, but I think I will have to try it another time!

Thanks for all the input and suggestions. Tomorrow I hope to get all the copper areas finished to 90 percent and then glue most parts and start on some serious weathering over the weekend!

17 December, 2014

Imperial Knight, day 17 - weathering, finally

Finally some weathering. Worked on many of the orange parts.


Here I also had a little fun testing the white on the rims. However, the weapons now look a little less strong.
You cannot have it all I suppose...

16 December, 2014

Imperial Knight, day 16 - more decals...

A late update tonight. Lots of decal work. Looks nice and takes time. Need to be done carefully and cannot be rushed.

 
So I have been slowly working my way over the model listening to a WFB podcast from the UK, HeelanHammer. Still need to sort out a few additional decals, but I have the main ones in place an looking great.

Status tonight: 8 updates to go before I want the model finished. It should be possible, but I need to keep focus. Tomorrow needs to be a day of the final decals and then a varnish to secure the decals. And then Thursday and forth should be all about weathering and base. Nice!

Regarding the rims - I think tonight's image will help to decide. Where it does look nice and old-school with all the white I think the decals and also the orange gets somewhat lost. Choosing copper instead will make the rims less pronounced and the orange will get more power. So I am thinking anyway...

15 December, 2014

Imperial Knight, day 15 - first decal!


First decal in 20 years or so! Tried them during my second year in the hobby and did not find the technique spectacular.
Now I think it looks like a nice tool. Useful for some things. But not magic. I look forward to see the rest of them on the model. That will no doubt look impressive.

btw, a few posts back Nicklas recommended a video tutorial on applying decals. Nice and very imformative!

14 December, 2014

Imperial Knight, day 14 - more details...

More checks to be painted in and a bit of weathering on the metal parts.


Of other hobby-related work I picked up a parcel at the postoffice with a bottle of both matt and gloss varnish for the airbrush, and I also made it to the local hobby shop to get some DecalFix. I really look forward to getting some of those decals in place...

13 December, 2014

Imperial Knight, day 13 - starting up on details

A few great comments in regards to the choice between copper or weathered white for the rims of the armour plates. I have not made my mind up yet, so I am painting details tonight.


12 December, 2014

Imperial Knight, day 12 - a moment of doubt...

Tonight I am closing in on that moment of choice for the rims on the armour. So far I have gone for white for the rims, but I had to put the model loosely together to see how it looks.


Quite alright I think. However, I also think the model would work with the rims painted copper. The reason for white is to be able to clearly show a lot of weathering. Going for copper instead would limit the white for the head and the weapons enphasizing these. But then there will be no extreme weathering on white, which I find usually is a great trick!

I think I will spend the weekend working on the heraldic shield, and get a head start on the banner, and possibly add some weathering to the metal sections. Maybe my vision will be clearer when I have all the yellow checks painted in. Oh, and I might work in some colours on the base to get a little contrast to all the orange. That might also help to decide...

11 December, 2014

Imperial Knight, day 11 - chainsword

Tonight I just dived in and wanted to see something finished. Or at least close to finished.
So I worked on the two weapons the big cannon and the massive chainsword. Quite pleased with the result, although obviously there will be some fine-tuning when the all the parts are put together.


For rust I used Vallejo Model Colour Mahogany Sand and Citadel's Ryza Rust. The oxide effect on the copper was achieved using Citadel Nihilakh Oxcide (who makes up these names!?!). I also added a bit of the old Citadel Hawk Turquoise here and there to add a little more blue to the oxide effect.

Of other things done today was to order some varnish - both gloss and matt for the airbrush. I am rather new to using transfers, but this is also one of those things I wanted to get some practice with. In a few days I will be convering this beast in transfer, and then add a lot of battle-damage and weathering on top. Should be fun!


10 December, 2014

Imperial Knight, day 10 - yellow glaze

Not a lot done today unfortunately. I have hit a few days of X-mas-busy evenings.
But I have added two succesive yellow glazes to the shoulder pad.

  
Also, but without any pictures for proof, I have added a wash to parts of the main metallic body. Every time there is some paints left, of a chance while something is drying, I see if I can add a little weathering to some of the metal parts.

09 December, 2014

Imperial Knight, day 9 - bloking in checks


Shoulder checks and checks on the shield. I have also planned some checks on at least one knee. Anyway, for the shoulder I lightly drew some lines with a pencil and simply blocked in the black squares. It could probably be done rather neatly with thin strips of masking tape and the airbrush, but for now I just went with the brush. When the black was roughly in place, I went over the white squares and tried to make the whole pattern work. Same work on the shield. I will later go over the white with a yellow glaze but this is it for tonight.

08 December, 2014

Imperial Knight, day 8 - more base colours build-up

 
More colours worked in. Chainsword and the armour plate for the cannon will be white with Copper rims. White painted using the airbrush - such a nice coverage. The white will be a great base for weathering and battle damage. When I eventually get to that part...

07 December, 2014

Imperial Knight, day 7 - armour plates grind

This is where the hard work begins. The chore of miniature painting. The grind: getting the base colours all over the model, to a nice finish, and getting the initial shading and highlights put in. All the work before weathering and getting into the details.


The image does not show a lot. Mainly it documents that I am working my way over the many parts...

So - to compensate for the slightly boring progress - I thought is would be the right place to put up a link to one of the main inspirational sources for getting into this project. On the Legion of  Plastic-blog the awsome Migsula showed the building of his Knight over a few updates in Spring 2014 and I have clearly picked up a few ideas and learnings from this execution of the kit.

If you haven't seen it before go an have a good look right away! Just follow the link below. Now! And if you have seen the project before why not take another look at the great work and also check out his more recent hobby-projects. Here is Migsula's impressive Imperial Knight:
http://legionofplastic.blogspot.dk/2014/04/raphael-freeblade-knight-eternal.html

06 December, 2014

Imperial Knight, day 6 - first work on the armour plates

Armour plates: I started out on the upper leg sections (and then dabbed some colour onto a few other parts as well) as they are quite small and somewhat insignificent compared to the bigger areas such as the lower legs. The reason for this was that I wanted to work out the technique for painting these big surfaces before getting onto the really big central ones. Also, I still had some doubts about the colours in some areas but knew that I wanted to do the orange.


Working my way over these two plates I tried both copper and ironbreaker/chainmail  (see the picture) on the rims. Although it might look alright as a separate part, I don't think either would work when everything is put together. I think the orange looked too light and bright and I also was considering how the armour plates were to stand out against the metal on all the body. so I when back to an ealier idea: white. However, the white will make trouble on the shoulder plates, since I wanted two black halves combined with a white with heraldry and a checked half with black and white. This will not work, but if I want the white rims I will have revise the plan for the shoulderpads front halves. Here is the revision: Right side will be orange with white heraldry, and the left side checked, but using yellow instead of white against black. This should work and look really strong.

Going back to the white rims the plan is to make them rather clean first and the go nuts with weathering. Getting some light surfaces on the model will help to make the weathering stand out I hope. Works on small models, so it might as well work here...

05 December, 2014

Imperial Knight, day 5

 
Torben Schnoor's old tip: If you are unsure about the direction of the mini, then paint the head first. Torben gave me this advice a long time ago, and I always go by it. Even if I know what I want I usually paint the head early since it defines a very central visual point on the model.

So, the faceplate: First a layer of light grey. Then some white sprayed on from above. From this I painted the metal rims using boltgun metal. Wash of purple ink and some really dark brown for the rivets. Then some Vallejo Model color (VMC) mahogany sand for rust followed by some more orange rust using that new orange technical paint from the GW range. Now, light brushed of mithrill silver on the rivits and on some of the edges – just where it seems that it will be realistic or look good! The next step was to add some weathering to the white. I used yellow green from VMC and some more mahogany sand. Well, that's it for the faceplate so far. Might need to do some little changes, but I am quite happy with the look.

04 December, 2014

Imperial Knight, day 4

Metallics. Drybrushed on some Tinbitz first. But realising that I wanted to add a lot of weathering I then airbrushed on a mid-tone metal colour. Actually, I was somewhat worried about using metal paints in the airbrush but after a few tried it went on nicely.


From there I have washed the lower leg to get som contrast in and also simply to get going on all that metal. Lots of weathering to do. First wash was a mix of VMC English Uniform and GW's Ogryn Flesh wash plus some water. Never thought I would find use for that Winsor & Newton Series 7 size 4 brush, but for this kind of work it is perfect!


 This is only the beginning of the work on the body, but I like to make my way around the model and get some colours onto all the parts. Just like blocking in the colours on a standard-sized miniature, I suppose.

03 December, 2014

Imperial Knight, day 3

Base colour. Orange. Well, first a foundation for the base colour. Before painting the armour plates orange I added a layver of bone colour (Army Painter zombie skin) to works as a warm foundation for the orange.


Following this I applied the basecolour (Army Painter Prison Jumpsuit) with the airbrush.


I was nicely surprised about the surface-finish of the basecolour. The airbrush was so easy to get the paint nice and clean onto the mini. Such an awsome tool. When I think about the considerations and doubt about getting that airbrush from my side prior to finally dishing out to buy one...
Oh, well. Now, at least, I have got it.

02 December, 2014

Imperial Knight, day 2

Priming the model I used black the main body, and white for all the armour plates. The color scheme is to be orange, black, white, and metals.Just by putting on the main armour plate and the shoulders you can really appreciate the size of the beast.

 
I really hope the piece-meal approach for painting the model will work out.
Well, onto getting some base colour sprayed on tomorrow....

01 December, 2014

Imperial Knight, day 1

This is my December hobby-grind: an Imperial Knight to be painted before Xmas!

 In the past I have done an X-mas count-down on my old website, www.jrn-works.dk, a few times. An update a day on a project, or sometimes just a series of unrelated models. But an update a day. This year I will try and keep a steady hobby grind going working my way over this big kit.

I have chosen this model for many reasons. Mainly because of the size and complexity, but also because I wanted to have a go at those classic tank weathering techniques. Also, with a model devided into many small armour plates I hope that I simply might be able to deal with the model piece by piece. That should - in theory - ease the process. Finally, the project is an obvious change to work those basic airbrush skills.

Time will decide if I can do an update every day, but I'll do my best. The main goal is to have a nice and focussed hobby-project during December!

20 November, 2014

2nd Daemonette

Another Daemonette finished. Quick paintjob, quick photo-shoot:


Sometimes it is amazing how much you can get done in half an evening.The model was about half finished, and taking to time to get it to the end was just great. I have got another model at the same mid-stage ready for next week...

21 October, 2014

Daemonette Project - first mini

Sat down to work on the first daemonette tonight. Just keeping the momentum going...


Just a little drybrushing on the base and possibly a little tweaking of the colours when the group is all done.
A miniature painted from start to finish in an evening. One of those nice hobby things.

20 October, 2014

Daemonette project - conversions

New little project. Doing a lot of different stuff at the moment. These are some the many ideas:


A skirmish group of daemonette conversions. Maybe they will even turn into some kind of an army.
Also, terrain is on my mind at the moment but more on that later...

11 October, 2014

Tyranid Termagaunt

 Found this model the other night with the base colours sprayed on with airbrush. I guess I did the airbrushing about a year ago and left it there. Anyway 50 minutes of painting and then the following evening about 15 minutes of final touches and the base and there is another model finished. Not to the greatests of standards, but I enjoyed getting the creature done in the colours and style that I wanted.

I used a mix of Citadel washes, some zombicide washes from Army Painter, white, bubonic brown (Yup! -g ot a bottle of that old Citadel classic!), and W&N red ink. Oh, and boltgun metal for the claws. All in all fun with a few colours and another model to go on the shelf.

09 October, 2014

Final WIP - Vilitch the Curseling

Looking nearly finished the model is not all there yet. A few little things has been touched since I took these images last Sunday. I sometimes do a few photos of a mini when I think it is almost there, but not quite at the same time either. A different set of eyes in a way, digital eyes, and blasted up in mega-size on the screen...

So seeing the mini up close in the photo I found a few little areas that could be improved. Mainly the feathers (deeper shading, stronger yellow), but also a few small other areas which has benefitted from a little more attention.


30 September, 2014

September Goal - end status

Well, September has been and gone and I almost finished my planned models:

The Night Goblin below was created as a warm-up for the Chaos Champion of Tzeentch.


So far both projects has been really fun, and I look forward to getting into the final work on the Chaos Dude. A really cool model btw. I quite enjoy painting him. As you can see I have been working with a palette of yellow and blue with bright green for spot colour. So something without red og orange for a change...

More picture of the Night oblin on www.jrn-works.dk in the gallery section...

13 September, 2014

Summer models - a Scion and a Techmarine

While I am working away to meet the September goals, I am just posting this quick image to show what I did during the Summer. Two models. A Scion and and old Techmarine. Not much, but they were fun to paint. Of course they want to hang out with the Skull Collector (painted in early 2012), so it got into the picture as well.


 Somehow I seem to have a thing about orange at the moment. I believe there will be more of that to come...

08 September, 2014

September Goal

After a posting-wise slow and empty Summer I will try and gather some impact and momentum.
These two models are my goals for September. Anything else will be a bonus.


During the Summer I did paint a few models but I was unsure whether to share or save for a future publication. Thinking back I believe the way to go about creating "exclusive content" for any future booklets or similar will be to take a few extra shots in the process, but I also want to publish the stuff I have painted when I finish it. I don't want to save finished models for the future. So unless it is a secret competition project my goal will be to produce and share when the model is done. Then there might be some additional stuff to show in some special form in the future, but since the sharing is a driving factor- a way to keep momentum - then sharing will be part of the regular hobby stuff.

11 July, 2014

Late 80s Nurgle Champion

Latest model painted up. A great model, about 25 years old! A Classic Champion of Nurgle:

Painted purely for fun, quickly, and using my new lamp. I want to push myself to try and paint a bit more bright. Stronger colours pop easier - both in the cabinets and on the gaming board...

Among other I used that new GW technical colour, NIHILAKH OXIDE, and also made good use of the bottle of Reaper Master Series Moth Green that I got from good friend Todd Swanson ( http://www.crookedeye.net/ ) in the mail a few years ago. Such a fantastic bright green colour.

15 June, 2014

Cropped photo - a merchant


Just took a quick picture of this guy the other day. Painted most of him over winther, but I actually still need to give him a base. Thus - for photography - I chose a scenic setting and cropped the image rather than showing the full (unfinished) figure on traditional white or blue/white backdrop. But somehow I actually quite like these cropped images - you kind of get a little closer to the character, than on the classic studio-images.

31 May, 2014

Booklet feedback wanted


With only a few POST-CENTAUR PAINTING-booklets left I am quite pleased about the venture. I have already recieved several comments and bits of feedback but I thought it would be nice to have a post reserved for feedback.

Overall, the feedback I have got so far has been quite positive and encouraging.

However, these are some of the wishes:
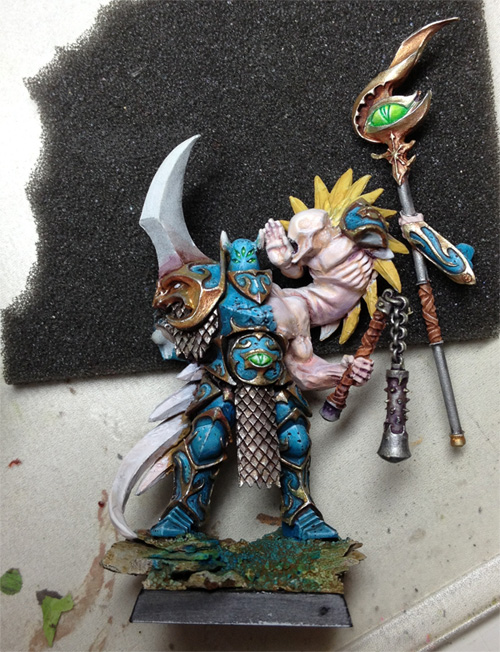
  • Closer looks at the miniatures. So bigger detail-shots.
  • More text as an improvement was also mentioned. I wonder if I could have taken the type-size down by one or two to make room for a few sentences more?
  • More sketches if possible.
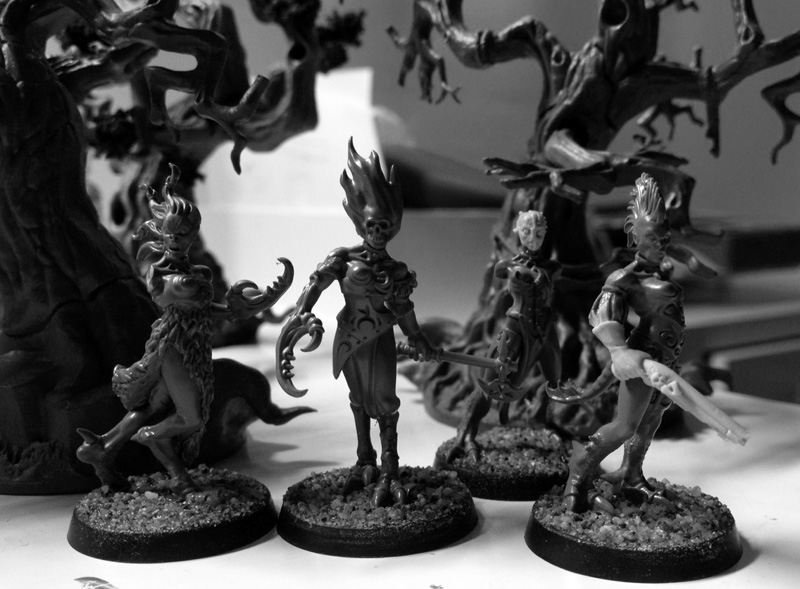
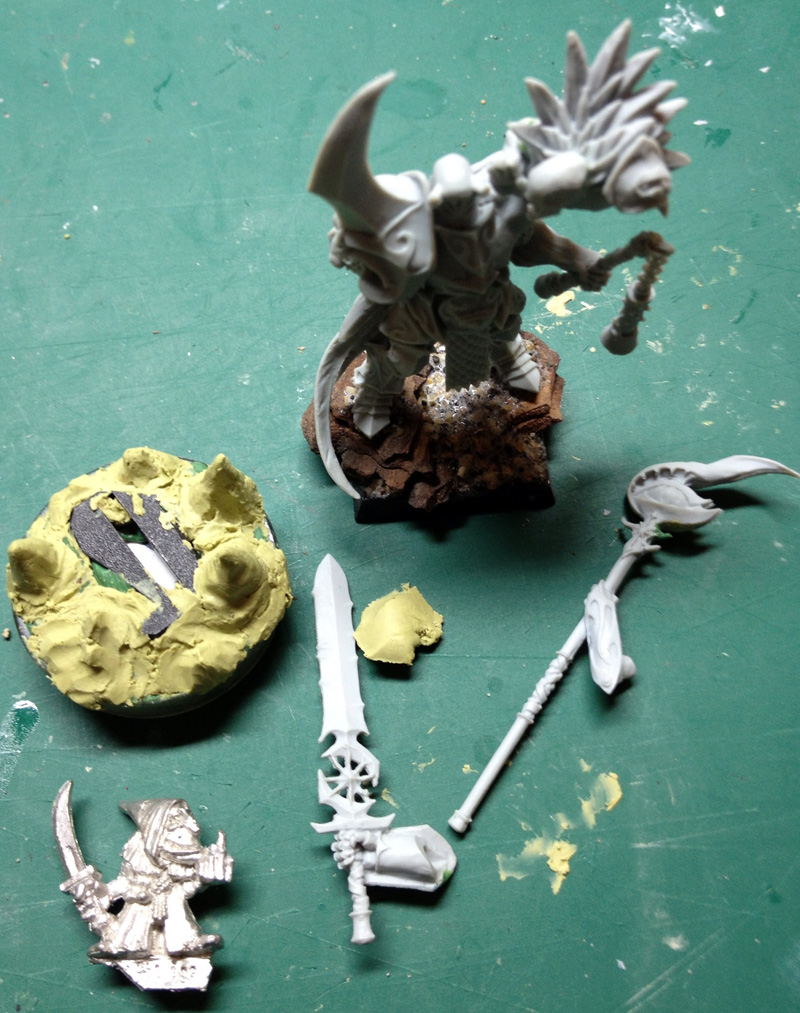
  • WIP-images has also been asked for.
  • Also, the spiral binding does take it a bit from a ”proper” book.
Lots of great feedback. Thanks a lot.

Of course I can only show sketches for a project if I actually made the drawings. As mentioned in the booklet I consider sketches a kind of visual notes. For me it is a combination of trying out a composition and planning what bits to use. Sometimes I do a sketch, at other times I just go directly into the conversion.

More text (and space for it) would be great in some places. For some of the models I could easily har used more space, but for one or two I felt like I could not add more using ”mere” words. Instead I left it to a short presentation and let the miniature speak by itself. But if more text is requested overall, then it is something to shoot for in the future.

The spiral-binding was a tricky one since the small format makes it hard to glue properly. The risk was that the pages might get loose and fall out if glued. However, a plus for the spiral-binding solution is that you never have to bend the paper to show a page-spread properly. I have actually come to like the spiral-binding very much, although I had my doubts about it at first.

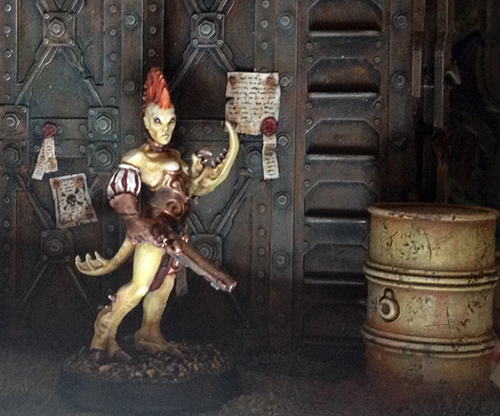
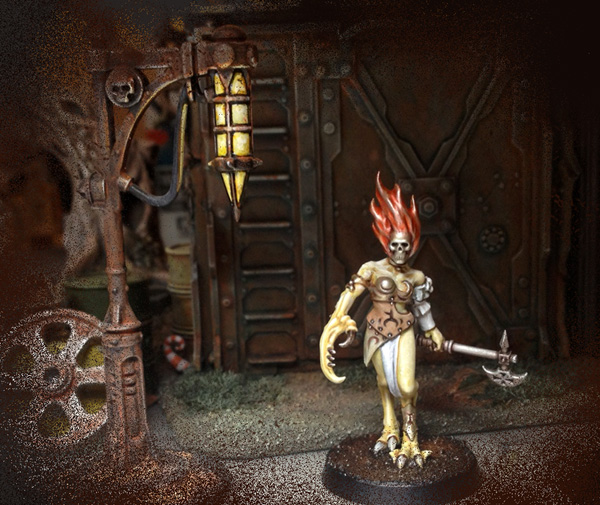
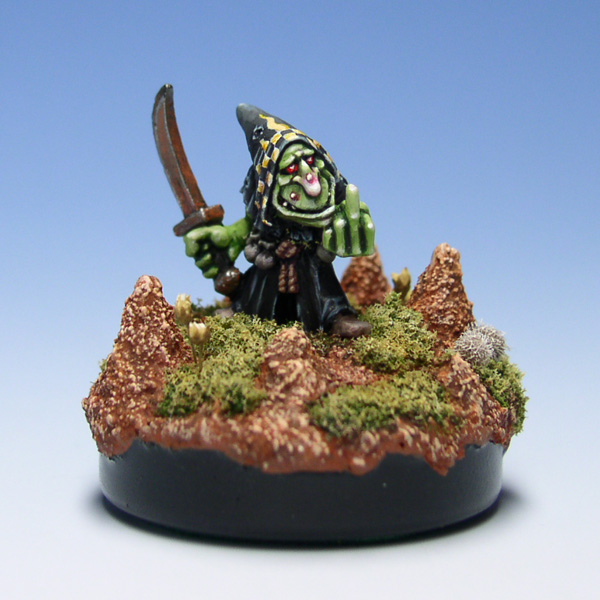
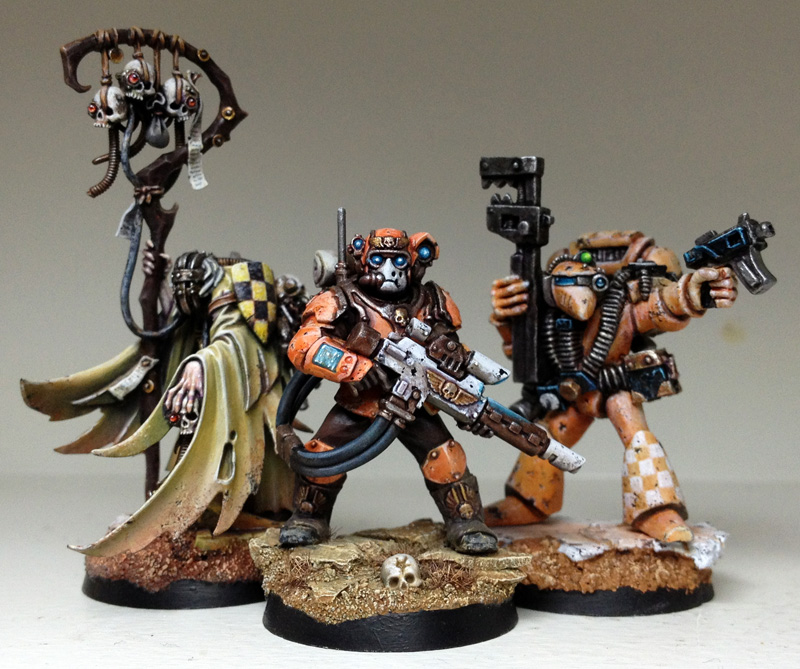
So far it has actually been a lot of 
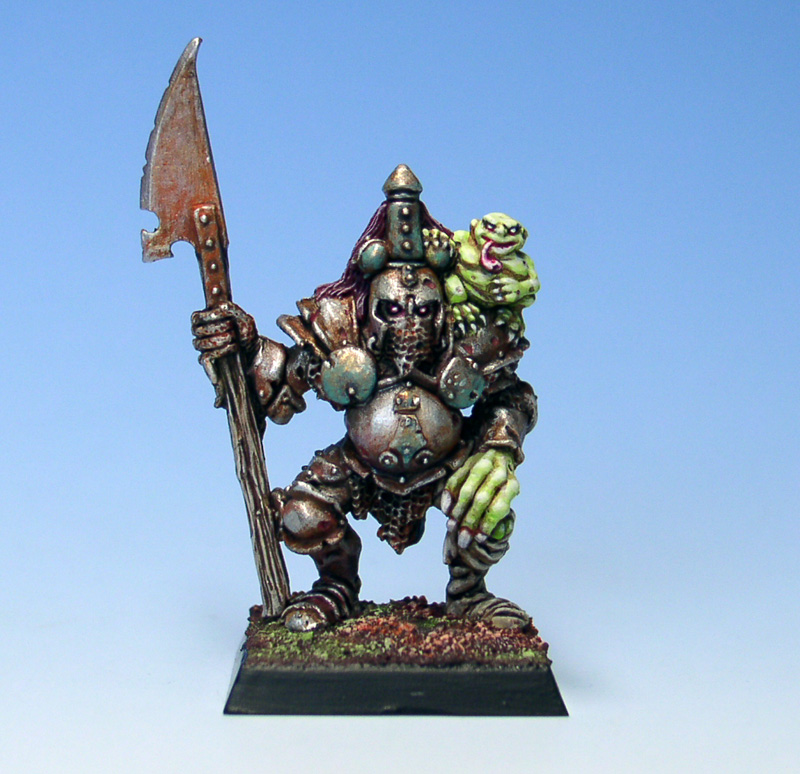
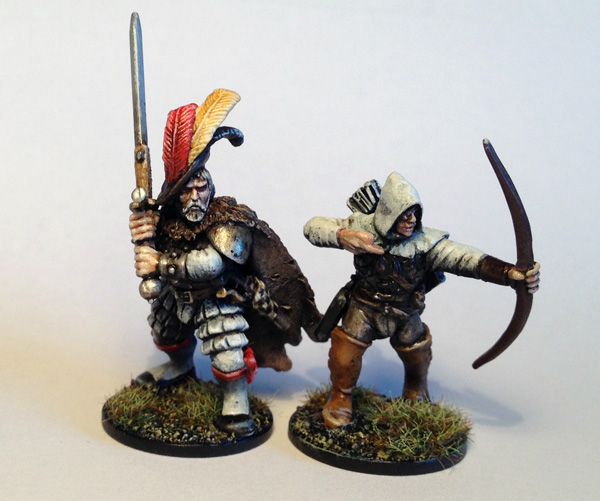
different things that people point out as their favorite bit. Some people like the my Mordheim gaming miniatures, some like the inquisitor characters, others comment on the overall stylistic journey.

But anyway, any comments on other issues or just a repetition of some of the pointers above will be greatly appreciated. Feedback is crucial - certainly if I am to look into doing a second booklet. Of course, you cannot make everyone happy and the topic or theme of a publication will always create some limitation. But that is part of the game!

*       *       *

For those who did not see the POST-CENTAUR PAINTING release post back in April, the booklet can be purchased through Runic Miniatures at the following stand-alone site, 

Happy Painting!

26 May, 2014

Mordheim captain and a bowman

Converted these guys last week and painted them in a 2-hours-frenzy last night


Most work went onto the leader. I am quite pleased with the combination of both getting the colours in the right places and the rough and textures look. Great - and quickly painted - gaming models I suppose. Next game with my Reiklanders is tomorrow evening!

19 May, 2014

Picking up the Wood Elves

With the release of the new army book for Wood Elves I have dusted off my small army and painted a group of 8 archers. I actually had them lying in a box all primed black and waiting for paint. 4 sessions of 1½ hours. Approximately. 4 evenings anyway. I started the army back in 2003 (!) and with no plastic archers available I used metal High Elves Shadow Warriors for my Glade Guard. Here they are:


Also, I have found this special mini in one of my old boxes:


Painted back in 1992 I think, he was part of Scarloc's Wood Elves Archers which I bought about a year into the hobby. So long ago. I remember repainting these models a few times as my techniques evolved. Now - again - he is to be cleaned up, repainted and join my army...

I guess I ought to show the army at some point also. I'll try to remember.